All Free Crafts

Free Crafts, DIY Projects and Patterns to Make Homemade Gifts

  • Craft Projects
    • Angels
    • Bath and Body
    • Gifts in a Jar
      • The Bakery
      • Soups and Sides
      • Sweets and Treats
      • Pickles and Preserves
      • Decorative Jars and Bottles
    • Paper Crafts
      • Decorations
      • Paper Rolls
      • Paper Plate Crafts
      • Homemade Cards
    • Kid’s Crafts
    • Easy Homemade Gifts
      • Decoupage Crafts
      • Personal Homemade Gifts
      • Candle Making
      • Objets d’art
      • House Gifts
      • Silk and Faux Florals
  • Celebrations
    • Christmas Crafts
      • Santa Crafts
      • Snowman Crafts
      • Christmas Displays
      • Christmas Ornaments
      • Recycled Greeting Cards
    • Easter Crafts
      • Easter Baskets
      • Easter Bunnies
      • Easter Eggs
      • Easter Projects
    • Valentine Crafts
      • Hearts and Crafts
      • Valentines for Kids
      • Romantic Ideas and Projects
      • Homemade Valentine Treats
    • Halloween
      • Pumpkin Crafts
      • Ghosts and Ghouls
      • Witch Crafts
      • Halloween Recipes, Games, Activities
      • Homemade Costumes
    • Thanksgiving
    • Mother’s Day
    • Patriotic Crafts
    • St Patrick’s Day Crafts
  • Patterns
    • Crochet
      • Crocheted Clothing and Accessories
      • Afghans and Blankets
      • Bags, Purses, Wallets
      • Kitchen Crochet
      • Quick and Easy Crochet Patterns
      • Crocheted Toys
      • Vintage Crochet Patterns
      • Filet Crochet
      • Baby Crochet Patterns
    • Knitting
      • Knitting Patterns for Home
      • Knitted Winter Accessories
      • Easy Knitted Gifts
      • Vintage Knitting Patterns
    • Sewing
  • Recycling
    • Cardboard
    • Containers
    • Denim
    • Greeting Cards
    • Household Goods
    • Lightbulbs
    • Recycled Paper
  • Nature
    • Birding
    • Botanicals
    • Bugs and Insects
    • Pine Cone Crafts
    • Shells, Sticks and Stones
  • Gardening
    • Annuals
    • Perennials
    • Clay Pot Crafts
    • Fall
    • Garden Crafts and Projects
    • Herbs
    • Indoor Gardening
AllFreeCrafts » Christmas: » Snowman Crafts » Shimmering Styrofoam Snowman DIY

Shimmering Styrofoam Snowman DIY

Sharing is Caring!
PinterestFacebookEmail

Last updated on December 5th, 2024 at 10:19 pm

shimmering snowman made with styrofoam balls

There’s a subtle shimmer to this DIY styrofoam snowman that adds to his appeal.

You can make this project in a size suitable for tabletop decorating, or put together a smaller version for hanging on the tree.

by Jane Lake

Craft Supplies:

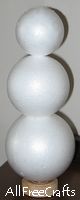
  • 3 styrofoam balls – we used 3″, 2½” and 2″ (just use smaller balls for a hanging snowman)
  • wooden skewer
  • 2″ round wooden disk (only for tabletop version)
  • DecoArt Glistening Snow-Tex or similar glitter snow paint
  • orange craft paint
  • 3 black shirt buttons
  • 2 shiny black beads for eyes
  • black seed beads
  • golf tee
  • small hack saw
  • black felt
  • two short twigs
  • white glue
  • pencil
  • small flat bristle paint brush
  • scissors
  • tweezers
  • optional: white craft paint for base disk

Project Instructions:

styrofoam snowman balls

Assemble the Foam Balls

Piece the larger styrofoam ball with the wooden skewer. Carefully push the skewer all the way through the center of the ball, then all the way through the center of the medium-sized ball. Pierce the last ball with the skewer, but this time do not push the skewer all the way through; stop about halfway, then remove the ball. Apply white glue to the exposed part of the skewer, then push it into the top ball again. Use scissors to cut off any excess skewer at the bottom.

To make a base for a tabletop snowman, glue the bottom of the three stacked styrofoam balls to a round wooden disk and let dry. If desired, paint the wooden disk white.

Apply Glistening Snow

Apply snow tex paint, beginning at the top and working downwards, gently dabbing paint on with a small flat paint brush. Once you have one coat of snow paint completed, fill in any bare spots with additional dabs of paint. Let paint dry.

Please check out the brother to this project: my Tall Skinny Plunger Snowman who has a family resemblance with a glimmering snow tex face.

felt snowman hat diagram

Make the Hat

To make the snowman’s hat, cut a 3″ circle from black felt. Now cut a 2″ circle from the center of the first one, leaving a 1/2″ brim all around. Cut a long felt strip, approximately 1/2 inch by 8 inches for the hat body.

Apply a bead of white glue around the inner circle of the hat brim (not on top, but around the inner edge of the circle, as shown in the diagram, at right). Begin pressing one edge of the long felt strip into place against this line of glue, so that it stands up within the inner circle, to create the body of the hat. If the felt strip overlaps, trim to fit and apply glue down the seam to secure.

To finish the hat, apply glue all around the edge of the remaining circle and gently fit it just inside the felt strip to make the top. Place the hat on the snowman’s head; if desired, glue in place.

shimmering snowman
Shimmering Styrofoam Snowman

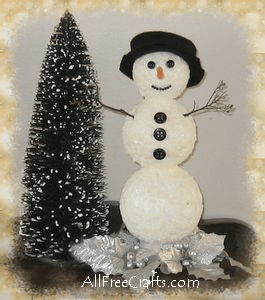
NOTE: This hat fits loosely on a 2″ ball, allowing the hat to be placed on an angle so that it covers most of the ball at the back. You can make a smaller hat to fit higher, or to fit a smaller ball. Just use the same construction method, but scale down the measurements to suit.

Add Finishing Details

Glue three black shirt buttons in a vertical row on the middle ball.

Use the hack saw to cut off the large end of a golf tee for the snowman’s nose. Poke the sharp end of the golf tee into the middle of the snowman’s face, to make a hole for the nose, then remove it. Paint the golf tee orange and let the paint dry. Apply a little glue to the flat end of the painted golf tee and insert it into the hole that you just made.

With your fingers press a shiny black bead into the styrofoam to make a shallow indent just above and to the right of the carrot nose. Repeat with the second black bead to make the left eye. Apply glue to the indented eye areas and insert the beads. Let the glue dry.

Now it’s time to give the snowman a smile. Squeeze a small drop of glue onto a piece of paper. Pick up a seed bead with tweezers, dip it into the glue, then press it into place on the face. Repeat with as many seed beads as you wish to make the snowman smile.

Finally, cut two twigs down to size for the arms. Insert each twig at shoulder height on the middle ball. Remove the twigs, apply a bit of glue to the end of each one, then re-insert into the arm holes.

Optional Presentation

» Cut a length of ribbon or felt to make a scarf. Tie the scarf around the snowman’s neck.
» Sit the tabletop snowman inside a decorative candle ring of artificial holly, evergreens, tinsel, or silver leaves.

Sharing is Caring!
PinterestFacebookEmail

Related Posts:

  • dried bottle gourds painted to look like a snowman
    How to Paint a Gourd Snowman
  • three jolly snowman, one made from a recycled light bulb
    Recycled Light Bulb Snowman
  • snowman chimney
    Chimney Snowman
  • candlecup snowman
    Candlecup Snowman Craft Project
  • snowman in a clay pot candle holder
    Clay Pot Snowman Candle Holder
  • tall and skinny plunger snowman
    Tall Skinny Plunger Snowman

By Jane Lake Filed Under: Snowman Crafts

Leave a Reply Cancel reply

Your email address will not be published. Required fields are marked *

Please explore ALL our FREE CRAFTS!

Recent Posts

  • How to Preserve Garden Herbs
  • Easy Willow or Vine Wreath DIY
  • Construction Paper Maple Leaf – DIY plus Video
  • How to Grow Cress Egg Heads
  • Happy Easter Bunny Signs
  • Bread Tag Weatherproof Bird House Roof

Basic Knitted Dish Cloth

Dishcloth – Basic Knitted Dishcloth Pattern

six hand knitted dishcloths is many colors

Free basic knitted dishcloth pattern, very easy to knit in cotton yarn.

...Free Home Knitting Patterns

Build the Right Bird House

How to Build the Right Bird House

build the right birdhouse

How to build the right bird house for the birds you want to attract, including dimensions, entrance hole sizes, check list of tips.

Homemade Hummingbird Food

Hummingbird Food Recipe and Care Tips

hummingbird food recipe and placement tips banner

Homemade hummingbird food; make an ant moat; storage, placement, cleaning and companion flowers.

How to Attract Orioles

Homemade Oriole Food

male Baltimore oriole on orange feeder

Homemade oriole food from a sugar and water recipe; attracting orioles with other foods and nesting materials.

More Birding...

Two Needle Knitted Mittens

free knitting patterns for two needle mittens

Free knitting pattern to make traditional two needle mittens for sizes child to adult.

More Free Winter Knitting Patterns...

Categories

Privacy Policy

Terms of Service

Copyright © 2025 ALLFREECRAFTS.COM