All Free Crafts

Free Crafts, DIY Projects and Patterns to Make Homemade Gifts

  • Craft Projects
    • Angels
    • Bath and Body
    • Gifts in a Jar
      • The Bakery
      • Soups and Sides
      • Sweets and Treats
      • Pickles and Preserves
      • Decorative Jars and Bottles
    • Paper Crafts
      • Decorations
      • Paper Rolls
      • Paper Plate Crafts
      • Homemade Cards
    • Kid’s Crafts
    • Easy Homemade Gifts
      • Decoupage Crafts
      • Personal Homemade Gifts
      • Candle Making
      • Objets d’art
      • House Gifts
      • Silk and Faux Florals
  • Celebrations
    • Christmas Crafts
      • Santa Crafts
      • Snowman Crafts
      • Christmas Displays
      • Christmas Ornaments
      • Recycled Greeting Cards
    • Easter Crafts
      • Easter Baskets
      • Easter Bunnies
      • Easter Eggs
      • Easter Projects
    • Valentine Crafts
      • Hearts and Crafts
      • Valentines for Kids
      • Romantic Ideas and Projects
      • Homemade Valentine Treats
    • Halloween
      • Pumpkin Crafts
      • Ghosts and Ghouls
      • Witch Crafts
      • Halloween Recipes, Games, Activities
      • Homemade Costumes
    • Thanksgiving
    • Mother’s Day
    • Patriotic Crafts
    • St Patrick’s Day Crafts
  • Patterns
    • Crochet
      • Crocheted Clothing and Accessories
      • Afghans and Blankets
      • Bags, Purses, Wallets
      • Kitchen Crochet
      • Quick and Easy Crochet Patterns
      • Crocheted Toys
      • Vintage Crochet Patterns
      • Filet Crochet
      • Baby Crochet Patterns
    • Knitting
      • Knitting Patterns for Home
      • Knitted Winter Accessories
      • Easy Knitted Gifts
      • Vintage Knitting Patterns
    • Sewing
  • Recycling
    • Cardboard
    • Containers
    • Denim
    • Greeting Cards
    • Household Goods
    • Lightbulbs
    • Recycled Paper
  • Nature
    • Birding
    • Botanicals
    • Bugs and Insects
    • Pine Cone Crafts
    • Shells, Sticks and Stones
  • Gardening
    • Annuals
    • Perennials
    • Clay Pot Crafts
    • Fall
    • Garden Crafts and Projects
    • Herbs
    • Indoor Gardening
AllFreeCrafts » Christmas: » Tree Ornaments » Satin Pearl Ornament

Satin Pearl Ornament

Sharing is Caring!
PinterestFacebookEmail

Last updated on November 9th, 2015 at 11:27 pm

Satin ‘n’ Pearl Ornament: Transform a styrofoam ball into an elegant satin and pearl trimmed Christmas ornament.

Satin and Pearl Christmas Tree Ornament

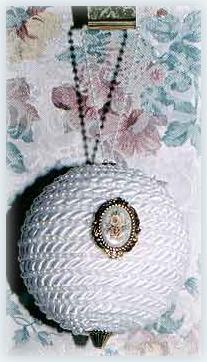
Satin and Pearl Christmas Tree Ball

Craft Supplies:

  • 3 inch craft foam ball
  • Small White Pearl Strands
  • 1/4 inch Satin cording
  • Hot glue gun and sticks (low temperature gun works best)
  • 1 flat gold bead
  • 1 cone shape gold bead
  • 1 decorative button
  • Pen or Pencil

Craft Instructions:

Using a pen or pencil, poke a hole about 3/8 inch deep into your foam ball. This will be your starting point for applying the cord. Add a drop of hot glue into the hole you just made and insert one end of your cording into the hole. Be sure the cord end is secure and no loose ends are free to unravel. A small piece of tape wrapped around the end will work for this.

Begin to glue the cord in place around the ball, starting at the hole and continue wrapping and gluing until you reach the other end of the ball. You are now at the bottom of your ornament. Once again, poke a hole into your foam at the centre and insert your final end of cord into this hole, making sure once again, that all strands of the cord are inside the hole, with glue secure all the strands.

Now begin at either end with your pearl strands. The pearl strands are applied in the same manner as the cord, except that you will apply the pearl strands, between each cord wrap (seam, where the cording strand meets). This is where a little extra talent with a glue gun is required. You need to apply the glue with a very steady hand, a very fine line of hot glue and press the pearls in place before the glue dries, without too much damage to your fingers. You will once again, insert your pearl strand ends into each end hole, as you did with the cording.

Once you have all your cord and pearls in place, it’s time to add the finishing touches. Cut a strand of pearls (about 6 inches in length) and if you can feed them through the flat gold bead, do this. If you can’t, then glue your bead over the top hole first and then glue your pearl strand ends to the centre of the bead. If you can feed the strands through the bead (I could), then feed just one or two pearls through the bead and glue the bead in place to create a hanger for your ball.

Glue a triangle or any bead of choice to the bottom (over the other hole in the foam) section of your ornament. Finish with a decorative button, charm or similar item of choice, by gluing in place (front centre) on your ornament.

I’m sorry that I didn’t measure the lenghts of cord and pearl strands required to make this ornament, but you can test the amounts required by using a straight pin to hold your cord in place on the foam ball, wrap your cord around the ball, securing with pins as needed, until you reach the other side. This is a good idea, if you are unsure as to whether you have enough cord to complete the project.

This ornament turned out much prettier than I had imagined and though the photo doesn’t show it well,
there is a wonderful rich sheen to the cord that sparkles when placed near lights.

Copyright © 1999-2015 Susan Spatone All rights reserved.
Published with permission from CraftAtHome.com

Sharing is Caring!
PinterestFacebookEmail

Related Posts:

  • popcorn ball ornament
    Popcorn Ball
  • lacy angel
    Lacy Angel Craft
  • golden beaded pear
    Beaded Pear
  • antenna
    Antenna Head Ball
  • plastic ball manger ornament
    Plastic Ball Manger
  • roly poly pilgrims craft
    Roly Poly Pilgrims

By Jane Lake Filed Under: Tree Ornaments

Leave a Reply Cancel reply

Your email address will not be published. Required fields are marked *

Please explore ALL our FREE CRAFTS!

Recent Posts

  • How to Preserve Garden Herbs
  • Easy Willow or Vine Wreath DIY
  • Construction Paper Maple Leaf – DIY plus Video
  • How to Grow Cress Egg Heads
  • Happy Easter Bunny Signs
  • Bread Tag Weatherproof Bird House Roof

Basic Knitted Dish Cloth

Dishcloth – Basic Knitted Dishcloth Pattern

six hand knitted dishcloths is many colors

Free basic knitted dishcloth pattern, very easy to knit in cotton yarn.

...Free Home Knitting Patterns

Build the Right Bird House

How to Build the Right Bird House

build the right birdhouse

How to build the right bird house for the birds you want to attract, including dimensions, entrance hole sizes, check list of tips.

Homemade Hummingbird Food

Hummingbird Food Recipe and Care Tips

hummingbird food recipe and placement tips banner

Homemade hummingbird food; make an ant moat; storage, placement, cleaning and companion flowers.

How to Attract Orioles

Homemade Oriole Food

male Baltimore oriole on orange feeder

Homemade oriole food from a sugar and water recipe; attracting orioles with other foods and nesting materials.

More Birding...

Two Needle Knitted Mittens

free knitting patterns for two needle mittens

Free knitting pattern to make traditional two needle mittens for sizes child to adult.

More Free Winter Knitting Patterns...

Categories

Privacy Policy

Terms of Service

Copyright © 2025 ALLFREECRAFTS.COM