Last updated on November 9th, 2015 at 11:22 pm
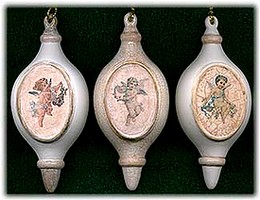
Nostalgic angel bisque ornaments.
Of Days Past Ornaments
Turn plain bisque ornaments into nostalgic works of art for the Christmas tree with a little paint, angel stickers, and crackle finish.
In a similar style, but with a wedgewood base, please see our Blue Bisque Ornaments page.
Craft Project Supplies:
- Bisque Ornament
- White Acrylic Paint [Ornaments 1 and 2 only]
- Burnt Umber Acrylic Paint
- Gold Acrylic Paint (Ornaments 1 and 2 only)
- Angel stickers
- Very small floral sticker (optional)
- Delta Ceramcoat Fine Crackle (Step 1 and 2)
- Gloss Varnish
- Small Paint Brush
- Liner Paint Brush
Craft Instructions:
Directions for ornaments in order from left to right view are as follows:
All Ornaments to be painted white. Allow the paint to dry completely. Mix together 1 part water and 1 part Burnt Umber Paint. Paint the center circle of ornament with this mixture, adding or removing paint with damp soft cloth as desired. You want an uneven and transparent finish.
Ornament 1With the same paint mixture as you used for the center, paint the top and bottom ring only. Ornament 3 is what your ornament should like like. Using gold paint, paint the ring around the center of the ornament and the top and bottom sections, leaving the top and bottom rings burnt umber. Allow to dry.
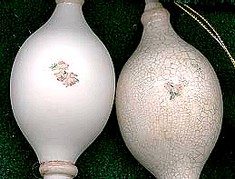
Place an angel sticker at the center as seen in photo and a very small floral sticker at the back center of the ornament [see photo below]. Press firmly. Following the manufacturer instructions, apply crackle medium to the center area and top and bottom gold and burnt umber painted areas only.
Once your crackle is completely set, apply white paint to all crackled areas. With a slightly damp cloth, wipe away excess paint, so that the cracks are filled with paint and very small amounts of white paint is visible over the painted area. Allow to dry and apply a gloss varnish to entire ornament.
Ornament 2
With the same burnt umber mixture, you used to paint the center of the ornament, paint the entire ornament, leaving a transparent finish. You can easily wipe away excess paint with a slightly damp cloth. I applied a heavier coat of paint around the top and bottom rings of the ornament, than over the balance of the ornament.
Paint the center outside ring with gold paint. Allow paint to dry completely. Apply and angel sticker to the front center and a small floral sticker to the back center of ornament [see photo below]. Press firmly.
 Apply crackle medium to the entire ornament according to the manufacturer instructions. Once the crackle is completely set, apply the same burnt umber paint mixture as used previously, to the entire ornament including the front center circle. You want the paint to fill only the cracks. Excess paint can be wiped away with a slightly damp soft cloth. Allow paint to dry. To the center area of the ornament, apply white paint in the same manner, wiping away any excess. Allow to dry and finish with a coat of gloss varnish.
Ornament 3
Apply an angel sticker to the front center circle and back center [see photo below], pressing firmly. Apply crackle medium to front center burnt umber painted area only, according to manufacturer instructions. Allow to dry completely.
Using the same burnt umber paint mixture as previously, apply to the crackled areas only. Wipe away any excess paint with a slightly damp cloth. Be careful not to smear any paint on the white areas. You want the paint to fill only the cracks.
Allow to dry completely and finish with a coat of gloss varnish.
Copyright © 1999-2015 Susan Spatone All rights reserved.


Leave a Reply