Last updated on December 26th, 2015 at 12:52 am

Patchwork Decoupage Container
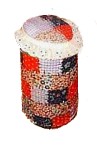
Recycle a drink crystals container, or similar cardboard or plastic tube container, by decorating with decoupage patchwork.
By Twila Lenoir
This easy decoupage technique uses up scrap fabric too, and makes a pretty country-style container that is ideal to contain candy, soaps, or sachets for gift-giving.
Craft Supplies:
- Crystal light container or similar cardboard tube container
- Scrap material
- 1 inch square cardboard template
- 2 inch square cardboard template
- Lace
- Glue
- Pinking shears
- Small amount of batting
- Permanent black marker (optional)
Craft Instructions:
1. Remove the paper label from the Crystal light container. Cut a one-inch square template and a two-inch square template from cardboard, for tracing on the material.
2. Cut several squares with pinking shears of different patterns of material. I used five different patterns of scrap fabric.
3. You will usually find a rolled rim, or similar line, at the top of most cardboard containers used for drink crystals or other food items. Beginning at the top, glue the fabric squares so they butt against, but don’t go over, the rim. Overlap each square as you proceed all around the container.
4. On each following row, glue the squares so that they overlap the row above just a little bit. Repeat all the way down.
5. If needed, glue the end of the bottom row under the bottom, or cut these squares down to fit.
6. Optional: when all the squares are dry, use the marker to draw small faux stitch lines on every line of the squares.
7. For the top of the container, make four two-inch squares and glue the edges together so that you have one large square. If your container lid is larger than this, keep adding squares until you have a piece of fabric large enough to cover the lid.
8. Place a small circle of batting on the container lid. Apply glue all around the lower lip of the lip. Place the patchwork fabric over the batting and smooth it in place so it is glued to the lip of the lid. Cut off the excess fabric all the way around. 9. To finish, apply more glue around the edge of the lid and trim with a length of pretty lace.


Leave a Reply