Last updated on May 1st, 2024 at 01:57 am

How to Make a Solar Cooker and Learn Basic Solar Cooking
Here we offer an introduction to cooking with solar energy including an easy plan to make your own solar cooker from cardboard boxes. There are many variations of solar cooker plans on the net, along with solar cooking recipes, hints and tips for making the most of your solar cooker and solar cooking communities where you can share information and benefit from the global experience of others.
With this in mind, we’ve compiled some great solar cooking resources for the beginner so that you can quickly access everything that you need to know – from soup to nuts solar cooking recipes, to safe and efficient operation of your homemade solar cooker.
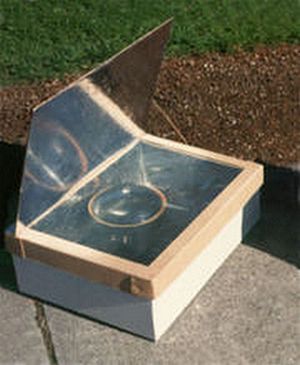
Minimum Solar Box Cooker – (shown above, right)
This simple cardboard box solar oven can be built in a few hours for very little money, thus the title. However, don’t be fooled – despite the simple design, this full-power cooker works very well and is in no way “minimum” as far as cooking power.
Minimum Solar Cooker
Supplies:
» Two cardboard boxes, with the inner box being at least 15 inch x 15 inch (38 cm x 38 cm), but bigger is better. The outer box should be larger all around, but it doesn’t matter how much bigger, as long as there is a half inch (1.5cm) or more of an airspace between the two boxes. The distance between the two boxes does not have to be equal all the way around. Also, remember that it’s easy to adjust the size of a cardboard box by cutting and gluing it.
» One cardboard sheet for the lid. This must be about 2 to 3 inch (4 to 8 cm) larger all the way around than the top of the finished cooker (the outer box).
» One roll of good quality aluminum foil.
» One can of “non-toxic when dry” flat-black spray paint.
» At least 1 cup of white glue
» One Reynolds Oven Bag. Common in major grocery stores in the U.S. or Canada or by mail-order from Solar Cookers International or Amazon. They are rated for 400 degrees F (204 degrees C) so they are perfect for solar cooking. They are not UV-resistant; thus they will become more brittle and opaque over time and may need to be replaced periodically. A sheet of glass can also be used, but this is more expensive and fragile, and doesn’t offer that much better cooking except on windy days.
Building the Solar Cooker Base
Instructions:
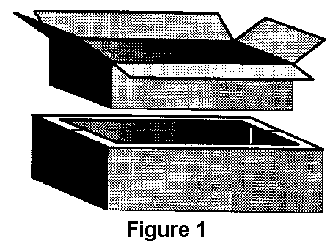
Fold the top flaps closed on the outer box and set the inner box on top and trace a line around it onto the top of the outer box. Remove the inner box and cut along this line to form a hole in the top of the outer box (Figure 1).
Decide how deep you want your oven to be. Ideally, it should be about 1 inch (2.5 cm) deeper than your largest pot and about 1″ shorter than the outer box so that there will be a space between the bottoms of the two boxes once the cooker is assembled.
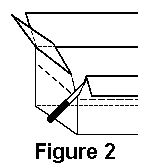
Using a knife, slit the corners of the inner box down to that height. Fold each side down forming extended flaps (Figure 2). Folding is smoother if you first draw a firm line from the end of one cut to the other where the folds go.
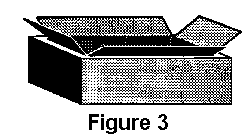
Glue aluminum foil to the inside of both boxes and also to the inside of the remaining top flaps of the outer box. Don’t bother being neat on the outer box, since it will never be seen, nor will it experience any wear. The inner box will be visible even after assembly, so if it matters to you, you might want to take more time here. Glue the top flaps closed on the outer box. Place some wads of crumpled newspaper into the outer box so that when you set the inner box down inside the hole in the outer box, the flaps on the inner box just touch the top of the outer box (Figure 3).
Glue these flaps onto the top of the outer box. Trim the excess flap length to be even with the perimeter of the outer box.
Finally, to make the drip pan, cut a piece of cardboard, the same size as the bottom of the interior of the oven and apply foil to one side. Paint this foiled side black and allow it to dry. Put this in the oven so that it rests on the bottom of the inner box (black side up), and place your pots on it when cooking. The base is now finished.
Building the Solar Cooker Lid
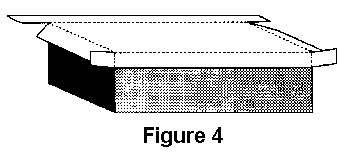
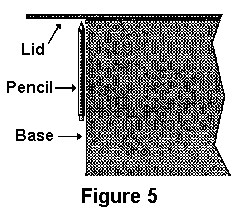
Take the large sheet of cardboard and lay it on top of the base. Trace its outline and then cut and fold down the edges to form a lip of about 3″ (7.5cm). Fold the corner flaps around and glue to the side lid flaps. (Figure 4). Orient the corrugations so that they go from left to right as you face the oven so that later the prop may be inserted into the corrugations (Figure 6). One trick you can use to make the lid fit well is to lay the pencil or pen against the side of the box when marking (Figure 5). Don’t glue this lid to the box; you’ll need to remove it to move pots in and out of the oven.
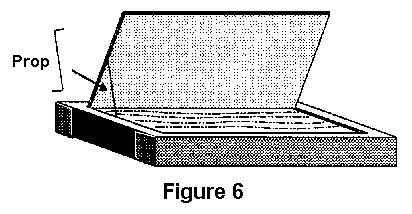
To make the reflector flap, draw a line on the lid, forming a rectangle the same size as the oven opening. Cut around three sides and fold the resulting flap up forming the reflector (Figure 6). Foil this flap on the inside.
To make a prop bend a 12″ (30cm) piece of hanger wire as indicated in Figure 6. This can then be inserted into the corrugations as shown.
Next, turn the lid upside-down and glue the oven bag (or other glazing material) in place. We have had great success using the turkey sized Oven Bag (19″ x 23 1/2″, 47.5cm x 58.5cm) applied as is, i.e., without opening it up. This makes a double layer of plastic. The two layers tend to separate from each other to form an airspace as the oven cooks.
When using this method, it is important to also glue the bag closed on its open end. This stops water vapor from entering the bag and condensing. Alternately you can cut any size oven bag open to form a flat sheet large enough to cover the oven opening.
Solar Cooking Hints and Tips
There is very little different about cooking in a solar box apart from doubling cooking time and leaving water out when cooking fresh vegetables or meats. All foods are cooked in dark covered pots except for roasting nuts and some baking. Use your own recipes and spices. By making small adjustments in time or the amount of water, your favorite foods taste as good or better than ever. The following approximate times are for 4-5 servings. Increase cooking times for larger amounts.
COOKED DRIED CEREALS AND GRAINS – (barley, corn, millet, oats, quinoa, rice, wheat) : 2 hours. Start with usual amount of water. Next time adjust to your taste.
VEGETABLES – Add no water. Artichokes: 2 1/2 hours; Asparagus: 1 1/2 – 2 hours; Other fresh green vegetables: 1-1 1/2 hours. If cooked longer they will taste fine but lose their nice green color. Beans – dried: 3-5 hours. Usual amount of water, can be soaked ahead of time; Beets, Carrots, Potatoes and other root vegetables: 3 hours. Cabbage, eggplant: 1 1/2 hours if cut up. Eggplant turns brownish, like a cut apple, but the flavor is good; Corn on the cob: 1 – 1 1/2 hours. The corn kernels will fade slightly if left longer in direct sunlight. The husk will hold the moisture in and protect the kernels naturally. A clean black sock can be put over an ear of corn to help absorb heat for faster cooking time. Squash, zucchini: 1 hour. Will turn mushy if left longer.
EGGS – Add no water. Two hours for hard yolks. If cooked longer the whites turn brownish, but the flavor is the same.
MEATS – Add no water. If cooked longer they just get more tender. Fish: 1-2 hours; Chicken: 2 hours cut up, 3 hours whole; Beef, Lamb, etc.: 2 hours cut up, 3 – 5 hours for large pieces; Turkey, large, whole: all day
PASTA – Heat water in one pot and put dry pasta with a small amount of cooking oil in another pot, and heat until water is near boiling. Add hot pasta to hot water, stir, and cook about 10 minutes more.
BAKING – is best done in the middle of the day (9 or 10 am – 2 or 3 pm) Breads: Whole loaves – 3 hours; Cakes: 1 1/2 hours; Cookies: 1 – 1 1/2 hours. Do NOT need to be covered. Avoid bottom crusts – they get soggy.
SAUCES & GRAVIES MADE WITH FLOUR OR STARCH – Heat juices and flour separately, with or without a little cooking oil in the flour. Then combine and stir. It will be ready quickly.
ROASTING NUTS – Bake uncovered. Almonds: 1 hour, Peanuts: 2 hours.
More Online Solar Cooking Resources
AllFreeCrafts is reader supported! Many supplies are found at thrift stores so try that first! However, if you buy from an affiliate link on this site, I earn a commission at no extra cost to you. As an Amazon associate, I earn from qualifying purchases. This has kept AllFreeCrafts.com online since 2002. Thank you!
How to Build a Parabolic Solar Cooker – includes step-by-step photos and instructions on how to build a parabolic solar cooker using a recycled mesh satellite dish.
How to Make the CooKit Panel Solar Cooker
Solar Powered Marshmallow Roaster
Solar Cooking Archive Recipes
Solar recipes divided into categories such as beverages, soups, breads, eggs and cheese, vegetables, casseroles, fish, meat, poultry, seafood and desserts.
 Portable Solar Oven (Amazon
)
Inexpensive, portable solar oven is great for camping, fishing, outdoor parties or just for fun. It works by directing the sunlight onto a pot full of food enclosed in a turkey bag. As the heat builds up, temperatures inside the pot can reach up to 300 F. It’s light and easy to use. Recipes, instructions, and a Turkey bag are included.
Cooking With the Sun: How to Build and Use Solar Cookers (Amazon)
Build a solar oven and a solar hot plate with a few dollars worth of materials and hand tools. This well written book includes directions for a solar oven that reaches 350 to 375 degrees F, and a solar hot plate that can reach 650 F in minutes. You can fry, steam, grill or poach with almost instant heat. Lots of recipes, including pizza, chicken and even pecan pie. Endorsed by the American Solar Energy Society and the National Renewable Energy Laboratory.
Cooking with Sunshine (Amazon link)
What could be more entertaining and magical than putting food into a cardboard box outdoors on a sunny day and taking it out fully cooked a few hours later? Learn how solar cooking works, plus how to cook over 100 great sun-fueled recipes and build your own inexpensive solar cooker.
Guide to Solar Cookers
A discussion about the different kinds of solar cookers, the advantages and disadvantages, as well as links to further solar cooking resources.
And, on AllFreeCrafts, see How to Make a Portable Solar Lights Board, so very useful during power cuts as an emergency light source but practical every day when you need to illuminate dark walkways or sheds.


lui c says
thanks this is a big help
Jane Lake says
You are most welcome.
Krishna murthy says
Hai,
I am interested in Solar Products suitable for India
madhubala says
Very very nice
Jane Lake says
Thank you. Glad you liked it!