Welcome
to our
Free Nature Crafts
section.
AllFreeCrafts Blog
Knitting Patterns Crochet Patterns Sewing Patterns
Christmas Crafts Valentine Crafts Easter Crafts Mother's Day Crafts Halloween Crafts Seasonal Crafts
Bath and Body Candle Crafts Craft Ebooks Kid's Crafts Homemade Gifts Gift in a Jar Home Decorations
Recycling Crafts ~ Recycled Light Bulbs Nature Crafts ~ Terra Cotta Crafts Gardening Crafts
SubscribeArchives

Nature Craft Project

Seashell Shadow Box


twit-button (8K)

    All our crafts are free for visitors of All Free Crafts only. Copyright 2002-2009 © Jane Lake All Rights Reserved. Do not copy, re-work or publish our crafts to your blog, group, or web site, by email, or in print, without written permission. Teachers and youth group leaders have special allowances. Please see TOS for details.
    seashells (44K)

    Seashell Shadow Box


    Designed by Jane Lake

    Copyright 2004-2006 Allfreecrafts.com


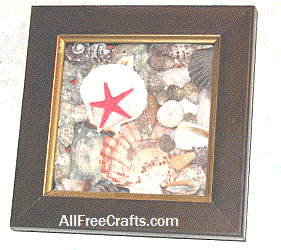
    Think inside the box! Nothing could be easier to assemble than this Seashell Shadow Box - which makes this seashell craft suitable for children as well as adults.

    This is also a great way to display seashells collected on your vacation, but if you can't do that, then Assorted Sea Shells by the Pound (shown below, right) might be an option for you.

    All you need for this nature craft is a shadow box and seashells. The shadow box pictured here was purchased in a dollar store; it had a plastic flower inside which was removed. Total size of this box is about 5" x 5". Sometimes deep picture frames can be adapted to use as a shadow box - watch for thrift store or garage sale bargains!

    Seashell Shadow Box Holder


    Craft Instructions:

    1. Remove the back of the shadow box and place the box on a table with the glass side down. Beginning at the bottom of the box, begin arranging the seashells. For the best balance, position several larger seashells as the lower layer, with medium sized seashells in the middle and smaller ones at the top.

    2. Place the seashells in upside down, so that you're looking at the bottom of them and the fronts will show through the glass.

    3. Use smaller shells to fill in any gaps between the larger shells. Gently pick up the box and tip it on a slight angle to force the shells to fall into a natural position. You'll probably find that this creates a gap at the top which should be filled in with more small shells.

    4. Preview your shadow box seashell display by carefully holding the box above your head to see through the glass. If the shells are positioned in a pleasing way, replace the cardboard back and fasten in place with the pins or tacks provided.

    5. If there is too much gap between the shells and the cardboard, fill the space with quilt batting, fun foam, more cardboard, or other lightweight material that will prevent the shells from moving.

    Print this page

    There are 10 comments
    Ruth Muench – Buffalo, NY
    Jul 02, 2009 - 18:15

    How to make shadow box with sea glass - what do I put in the back of the shadow box to glue the sea glass to? What kind of glue? I have found quite a lot of sea glass. Help - Thank you a lot

    Reply to Ruth Muench
    kay hoover – kay-hoover@hotmail.com
    Oct 27, 2009 - 21:47

    i wish you could tell me more to make out of seashells. thank you very much,kay

    ashleigh – florida
    Jan 07, 2009 - 15:09

    does anyone know how to make beach sand stick to the backing of a shadow box to display shells on

    Reply to ashleigh
    Wendy – england
    Jan 07, 2009 - 16:28

    I would use sandpaper that a carpenter would use to sand down wood.

    Reply to ashleigh
    HomeDepot
    Jan 14, 2009 - 16:21

    You can use an aerosol spray glue on the background, then sprinkle a generous dose of sand.

    Reply to ashleigh
    Suzanne
    Jan 18, 2009 - 20:33

    You can use tackey glue, cover and paint the entire background w/ a paintbrush full of the glue, then cover the whole surface w/ sand. Gently press, let dry, then tap off excess. Can apply shells w/ tackey glue too. Works great.
    It even holds up to moisture in my bathroom. Hope this helps!

    Reply to ashleigh
    ms.bennett – wareham
    Apr 17, 2009 - 11:40

    i would glue and sand let the sand dry then finish your project!!

    Reply to ashleigh
    kelli
    May 29, 2009 - 01:32

    You could use the "sand" spray paint from a hardware store... unless you were using specific sand for sentimental reasons. If not, the paint would be an easy, less messy way to go.

    To glue actual sand, you could put down a thick layer of craft glue and put a heavy layer of sand on top, then leave it for a day or two till the glue is dried. Then just brush off the sand that didn't stick!

    dionne – canada
    Jul 14, 2008 - 09:58

    this is a cool project and i really liked it!!

    i think it will be really fun and it would turn out very nice if it works!!

    thank you bye!!

    rey – Philippines
    Jul 11, 2008 - 04:15

    I ask for some sample of your crafts and arts in seashells if you can sent to my email.
    thank you very

    rey

    Leave a Comment


    ?
    ? ?
    ?

    Powered by TalkBack


    More Free Seashell Crafts:

    How to Make a Seaside Mail Organizer

    Clam Shell Change Holder

    Make a Fishbowl Sea Candle

    Nautical Decorating Ideas

    Seashells by the Pound
  • Sizes 3/4" to 3" wide
  • Approximately 40 shells
  • Scatter on your table for a nautical flair


    cover


  • Wooden Letters

    craft supplies


    All Free Crafts Home | All Free Crafts Blog |
    Knitting Patterns | Crochet Patterns | Sewing Patterns |
    Candle Making | Gardening | Gift in a Jar | Home Decorating |
    Homemade Gifts |Kid's Crafts | Nature Crafts| Recycling |
    Seasonal | Easter | Halloween | Christmas | Mother's Day | Valentine's Day |
    FAQ | Contact Us |
    Terms of Service | Copyright | Privacy Policy | Legal Disclaimer
    Copyright © 2002 - 2010 All Free Crafts.com All Rights Reserved Worldwide