Last updated on October 30th, 2021 at 01:20 am
Lavender Crafts: How to Make a Lavender Fan
By Jane Lake
AllFreeCrafts is reader supported! Many supplies are found at thrift stores so try that first! However, if you buy from an affiliate link on this site, I earn a commission at no extra cost to you. As an Amazon associate, I earn from qualifying purchases. This has kept AllFreeCrafts.com online since 2002. Thank you!
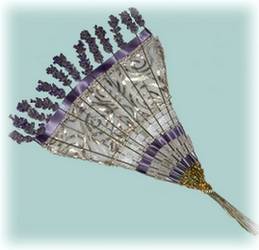
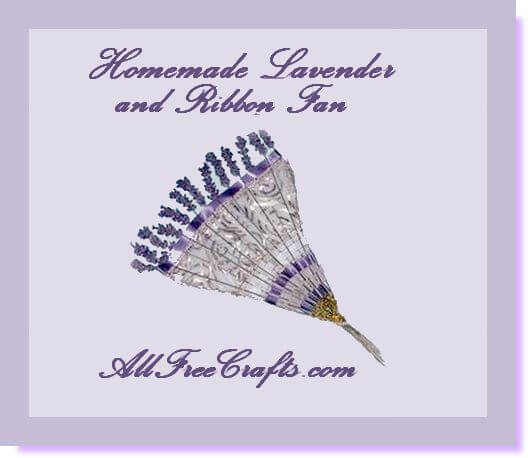
This lavender fan is made from lavender buds and stems, plus scraps of ribbon of various widths. It can be hung on a wall, displayed on a nightstand or dresser, or suspended from the hook of a coat hanger to lightly scent your clothes.
Of course, in the heat of the hot summer sun, you might also use it to fan your face, allowing the calming fragrance of lavender to gently waft over you, soothing your nerves as well as cooling your skin.
For the best use of the stems in lavender crafts, harvest them just before the buds begin to open for long-lasting effect.
Once the buds begin to lose their fragrance, you can renew the scent with just a drop or two of Lavender Essential Oil.
Materials to make a Lavender Fan:
- 13, 15, or 17 lavender stems, at least 10 inches long
- variety of ribbons (and, optionally, metallic cord, yarn and pearl strands)
- small amount of Aleene’s tacky glue, craft glue or hot glue
Lavender Fan Instructions:
1. Gather the lavender stems and tie them together as shown, about two inches from the bottom edge of the stems. Make sure all of the buds are even at the top and remove the odd flower buds that appear about a ½ inch beneath the main bud on some of the stems. These orphan buds will just get in the way when you reach that stage in the weaving.
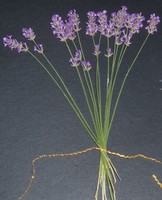
2. I used thin gold rick rack to tie the bunch together, then began the fan weaving with one end of the rick rack, running it from one side of the fan to the other, going over and under each stem, then reversing and going under and over each successive stem on the next row.
I ran the other end of the rick rack in behind, then proceeded on with the weaving once the first strand was finished, but you could just snip off this extra strand and begin with a new one. At this initial stage, the weaving is easier with thin yarn or cord which separates the stems without spreading them apart too far.
3. The weaving process always begins at one side of the fan, with the yarn or ribbon going under and over each stem, then reversing the order in the row above it. This has the effect of straightening the stems and adding some strength to the fan.
4. Attach each new ribbon or yarn to one side of the fan by folding a little bit of ribbon end over the first stem or the second stem (depending on whether you should begin by going under or over). Secure the folded ribbon with glue, pressing the edges together until the glue holds. I used Aleene’s tacky glue, but I believe hot glue might also work well and hold a little quicker.
5. As you progress toward the top of the fan, you should spread the stems out evenly and, if desired, you can increase the width of the ribbons. In the lavender fan shown, the second to last ribbon is wire edged and two inches wide. The wire edge isn’t strictly necessary but does reinforce the weave and provide rigidity.
6. The final ribbon is woven through the top of the stems, right below the lavender buds. You will find that this ribbon is woven fairly loosely, because the stems are spread to the widest width.
Suggestions:
Vary the ribbons for interest and texture. Pearls on a string add a little whimsy, while metallic cord or gold flecked ribbons add shine. And, of course, nothing goes better together than lavender and lace.


Leave a Reply