Last updated on March 15th, 2024 at 09:58 pm
 Mosaic Shoulder Bag – free knitting pattern
by Amy Polcyn
Photography: Molly Crealock
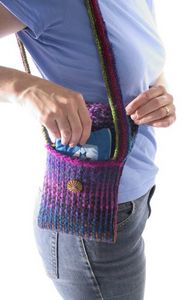
This is a flap-front purse in a simple mosaic pattern using variegated yarn to give the illusion of complex colour work. The firm fabric of mosaic knitting, combined with a tighter gauge, results in a bag that won’t sag!
Finished size is 8 inches (20cm) wide and 6 inches (15 cm) high.
MATERIALS
- »Noro Kureyon [100% heavy worsted-weight wool; 110 yd/100m per 50 gm skein] 3 skeins
- »3.75mm (US 5) traight needles, 3.5mm (US 4) straight needles
- »Yarn needle
- »Sewing needle
- »Decorative button (1” wide)
- »Coordinating thread
GAUGE
- »24 sts/26 rows= 4”/10cm using larger needles in stockinette stitch
PATTERNS
Mosaic Knitting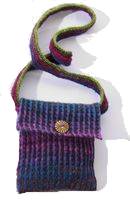
This pattern is worked using mosaic knitting. This is a form of colourwork that uses only 1 color per row, but has the appearance of Fair Isle stranding. Before beginning, 2 smaller balls must be prepared from each skein of yarn, with each ball beginning with a different section of the colourway. As the piece is worked, there will appear to be 2 different colors in the pattern. Designate one ball “Ball A” and the other “Ball B.”
One-Row Buttonhole
- Bring yarn to front of work, going between the needles.
- Slip next stitch purlwise, return yarn to back of work. Leave yarn hanging for now.
- Slip next stitch purlwise, and lift first slipped st over it and off the needle.
- Continue in this fashion, binding off a total of 6 sts.
- Slip last st from right needle to left needle and turn.
- Bring yarn to back of work and increase 7 sts (need one extra) using a cable cast on (insert needle BETWEEN last 2 sts, pull a loop through as for a knit stitch and place stitch on left needle.)
- Turn work. Slip first stitch to right needle and pass “extra” cast on stitch over it and off the needle. Continue row in pattern.
METHOD
Bag
- ** slip all stitches as if to purl
- »With larger needles, CO 48 sts. Work as follows:
- »Row 1: With Ball A, work [k2, sl 1] 16 times across row.
- »Row 2: With Ball A, work [sl 1, p2] 16 times across row.
- »Row 3: Drop Ball A, join Ball B. Work [k1, sl1, k1] 16 times across row.
- »Row 4: With Ball B, work [p1, sl1, p1] 16 times across row.
- »Rep Rows 1-4 for pattern until piece measures 16 inches (42.5 cm) from CO row.
- »Next Row: Work buttonhole as follows: work in pattern over 21 sts, work one-row buttonhole over 6 sts (as described above), complete row in pattern.
- »Continue in pattern for 1 more inch (2.5 cm).
- »Bind off.
Strap
- »With smaller needles, CO 18 sts. Work as follows:
- »Row 1: With Ball A, work [k2, sl 1] 6 times across row.
- »Row 2: With Ball A, work [sl 1, p2] 6 times across row.
- »Row 3: Drop Ball A, join Ball B. Work [k1, sl1, k1] 6 times across row.
- »Row 4: With Ball B, work [p1, sl1, p1] 6 times across row.
- »Rep Rows 1-4 for pattern until piece measures 28 inches (70cm) from CO row. »Bind off.
- **Alternatively, you can cast on 150 stitches and knit garter stitch for 7 rows. Bind off.
FINISHING
- »The long edges of the strap will curl toward the back and meet in the center, forming a double thickness. This helps give the strap strength and resistance to stretching. Using the yarn needle, whipstitch the two long curled-over edges together along the back of the strap to secure.
- »Fold main piece, right sides together, so that 12” (30cm) of the total length composes the bag and 5” (12.5 cm) is left free for the flap. With yarn needle and length of yarn, whipstitch the sides together. Turn to right side. Sew strap firmly to sides of bag. Using a sewing needle and thread, attach button to front of bag, lining it up with the buttonhole on the flap. Block as needed. Voila!
You may also like this no-knit Christmas Ornament for Knitters, made from a two-part transparent Christmas Ball, a mini skein of yarn and free printable labels.
About the author: Amy Polcyn is (almost!) a TKGA Master Knitter who enjoys designing and knitting more projects than she has time for. She especially loves working with color, including complex Fair Isle designs. When not knitting, she is mom to Emma and an elementary school teacher. Originally published in the now defunct Spun Magazine.


Leave a Reply