Rock your little baby doll in a miniature doll cradle from a recycled cardboard salt container, plus some leftover lace and felt scraps. Because the salt container is round, just a gentle little push will rock the cradle and lull your baby doll to sleep.

What You Will Need:
- one empty, round, cardboard salt container box
- serrated knife
- scrap of colored felt for a pillow
- scrap of colored felt for a blanket
- craft glue
- small doll to fit in the cradle
- small amount of pregathered lace
- optional: one spring-type clothes peg
by Jane Lake
Recycling Instructions for the Salt Box
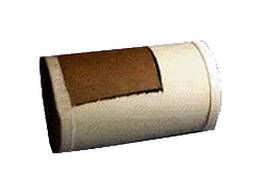
1. Ask an adult to cut an opening in a round cardboard salt container. Let them see the picture shown here so that they know how the opening should look. Tell them that a serrated knife is recommended to cut the opening through the cardboard.
2. Once you have the opening cut in the container, you can paint it, inside and out, in whatever color you choose. Let the paint dry. At this point, you can add more decorations, either hand-painted or stamped designs, stickers or transfers.
3. Cut a length of pre-gathered lace to fit all around the cut edges of the salt box. Look at the photo to get an idea of how this should look. Glue the lace all around the cut edge.
4. Make a pillow that will fit inside your recycled salt box cradle by cutting a piece of felt that is large enough for you to fold it in half and stuff with two or three cotton balls. Gently put the cotton balls in place and glue together the three ends around it. If you know how to sew, you can sew the edges together instead of gluing. This should make an excellent felt pillow for your cradle.
5. Cut another rectangular piece of felt to make a blanket that is big enough to fit around the baby and tuck in at the sides. If you are unsure about the size, cut on the large size because then you can always cut it down, if needed, to fit.

6. Your baby cradle is now complete.
Optional Wooden Stand – no Rocking
If you wish, you can take the spring out of a clothes peg, discard it, and paint the two wooden pieces to match the cradle. Glue the peg pieces to the bottom of the salt box, with one piece facing one way and the other facing the opposite way. This makes a sturdy wooden stand for your cradle, but you won’t be able to rock it back and forth.
Now, whatever design you chose, put your baby to sleep in her brand new salt box cradle and sing her a lullabye!
Recommended Related Crafts:
Sleep Baby Sleep Doll to hand sew and embroider.


Leave a Reply