Last updated on March 5th, 2016 at 11:44 pm
How to make a hollow book safe to hide small personal valuables “in plain sight”.
Altered Hollow Book Safe
By Jane Lake
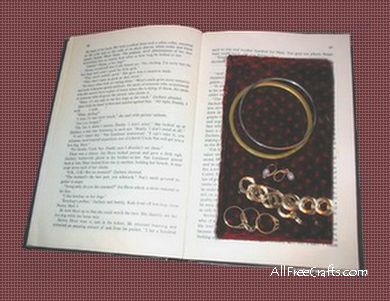
There is something mysteriously appealing about a hollow book safe – it is a practical idea that adds to home security, but is also an ideal treasure box for sentimental keepsakes.
Here we show you how to recycle a hard-bound book into a book safe to hold your secret treasures, love letters or valuables while traveling or at home.
This free craft project would make a cool homemade gift for mom, dad or teens. Choose the book with the recipient in mind – Dad may appreciate a book safe made from an old car manual or history book, while Mom would prefer to stash her cash in a sewing book or romance novel. If placed on a shelf with similar books, the altered book safe will fit right in and no one will ever guess its true purpose.
Supplies:
- Hard cover book of sufficient size to allow a cut-out of 1/2″ to 1″ deep
- Exacto knife
- nail scissors or similar
- non-fraying fabric or felt for lining
- hot glue gun and glue sticks or strong craft glue
- scrap cardboard
- ruler
- pencil
Instructions:
Caution:
Exacto knifes are VERY sharp. Although the instructions for this craft are relatively easy, it does involve deep cutting with an Exacto knife and may be dangerous for some people to do.
This is definitely NOT a safe craft for children!
Please proceed with this craft at your own risk.
1. If your book has a paper cover, remove it and replace it when you are finished making the book safe.
 2. Open the book and decide how deep and how large you want the hollow opening. Measure and mark the width and height of this rectangle on a page that is at the depth that you have chosen, measuring the depth from the inside of the back cover. The cut side near the center of the book should be far enough from the center to allow use of the ruler as a straight edge for cutting; usually this means at least a ruler width away from the center line.
3. You may need to support the side of the open book that you are not cutting, so that the other pages lie flat as you work. If so, use another book placed under the open front cover to support it. You could also use a rubber band to hold the loose pages to the front cover and away from your work area.
4. Begin cutting with the Exacto knife, using the ruler as a straight edge on each side of the rectangle, cutting down through about a 1/4″ inch of pages. Take particular care with the corners to ensure each cut meets the cut that joins it.
5. Remove the cut out rectangle that you just created and discard. Use nail scissors if it is necessary to trim the sides straight.
6. Lay down the pages that now have an opening cut in them, and draw around the inside of this rectangle, on the page directly below, so that you may repeat the cuts exactly.
7. Repeat steps 4 to 6 until you reach the back cover. Place a piece of scrap cardboard inside the back cover as you work on the last section, to avoid scoring or cutting the back cover with the knife.
8. Cut fabric or felt to fit the bottom of your rectangle. Measure the depth, and cut one or more strips of fabric to this size, with enough length to cover all four sides of the rectangle.
9. With the glue gun, place enough hot glue in each corner of the rectangle and up the sides to secure the pages in place, forming your “book safe.” This will be covered by your fabric lining.
10. Use hot glue to secure the side strips of fabric all around the rectangle, being careful that the fabric does not extend anywhere above the opening or the book will not close properly.
11. Finally, use hot glue to fasten down the bottom lining fabric. Cut away any glue “strings” once the glue has cooled, and close the book. If you have one, replace the paper book cover. Your book safe is now ready to hide money, valuables or keepsakes in its secret compartment!


Leave a Reply