Last updated on September 7th, 2015 at 11:31 pm
Grim Reaper
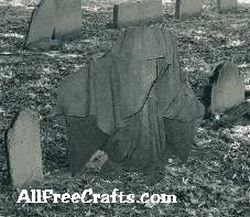
This Grim Reaper model, which stands about two and a half feet high, will be a definite conversation piece at your next Halloween gathering. Use a flashlight, or other non-flammable form of lighting, to illuminate him from the inside out – just place beneath his robe for an eerie glow.
Surround him with faux tombstones, and a skeleton or two, for a complete Halloween tableau.
 What you will need:
- 9″ balloon
- two 2-litre pop bottles
- masking tape
- tin foil
- 1.5 to 2 yards of cheap, thin black fabric
- large garbage bag or plastic drop sheet
- 1 or 2 16oz bottles of fabric stiffener (or mix white glue with equal parts water)
- bowl to soak fabric in fabric stiffener
- wire coat hanger
- wire cutter or tin snips
Optional Props:
– plastic sickle
– kid’s skeleton mask
– flashlight
– fake pointing finger
– fake tombstones
Instructions:
 This project can be messy so before you begin spread a plastic drop sheet or large garbage bag over your floor or work surface.
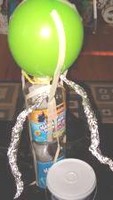
Construct the grim reaper’s base, visualizing the finished shape that you have in mind. Fill one of the pop bottles with water to provide weight and stability as you work. Tape an empty pop bottle, upside down, to the first one, using masking tape around the bottle necks. This will be your main base.
Blow up the balloon and tape this securely to the top bottle.
With wire cutter or tin snips, snip apart the wire coat hanger and bend to approximate the position of the grim reaper’s arms. If you are going to attach a plastic sickle or fake pointing finger, keep that in mind as you arrange the arm position. Attach the bent wire securely to the bottle base with masking tape. Wrap tin foil around the wire arms to provide a larger base area.
If you wish, you could attach a child’s skeleton mask to the balloon to provide more facial definition, but this is not mandatory.
Soak fabric in fabric stiffener solution (either commercial or homemade recipe of one part white glue and one part water). Wring out excess and begin draping the fabric over your built up base. The grim reaper traditionally has a hooded cowl, so fold the fabric to create a hooded look around the face. Loose, long sleeves that hang down to points are another common “grim reaper” look, but experiment to see what you like best. Allow fabric to form the suggestion of feet or shoes hiding beneath the gown.
Once the design is satisfactory, allow to dry completely. This might take a couple of days depending on the temperature and humidity. Once the model is fully dry, remove the base and allow the grim reaper to stand alone. Add whatever optional props you want – a creepy fake hand, pointing finger or plastic sickle are some popular eerie choices.


Leave a Reply