Last updated on March 6th, 2016 at 12:03 am
Homemade Ribbon and Lace Message Organizer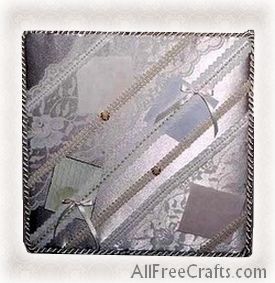
Use leftover ribbon and lace, or buy end-of-roll trims on sale to make this economical ribbon and lace message center. Slide phone messages, appointment cards or personal love notes under the ribbons to keep family members organized and “on the same page.”
Material:
- Styrofoam Board, any size (plywood or other wood can also be used)
- Batting
- Lace
- Ribbon
- Decorative Trim
- Decorative Buttons
- Hot Glue and gun (low temp works best)
Project Instructions:
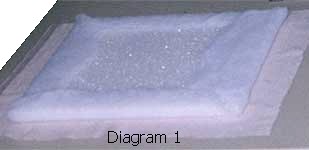
Referring to diagram 1, cut one each of fabric and batting to fit your board and extend over the sides approximately 2 inches.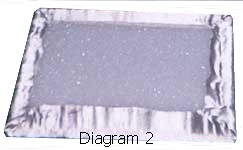
Using hot glue (low temp works best), secure the batting in place on the back of the foam board and trim away any excess batting.
Referring to diagram 2, fold your fabric over the batting and secure the fabric, using hot glue and trim away any excess fabric.
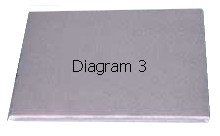
Diagram 3 shows the front of your board, once all fabric has been secured to the back.
Decide where you want lace and ribbon to be placed on your board and cut each piece of ribbon and lace to fit the board, allowing a few inches to extend on to the back of the board.
Using hot glue, secure your ribbon and lace pieces to the back of the board only. Do not use glue on the ribbon and lace on the front of the board (you will not be able to insert notes if you do).
In diagram 4, you can see the placement of ribbon and lace. The lace has all been secured first and then decorative trim and ribbon were added on top of the lace. Two buttons were glued to the decorative trim and directly beneath the buttons, is a dot of hot glue, used to secure the decorative trim on the front of the board.
Some of the trims that I used, are quite heavy and required a dot of glue to prevent the trim from sagging. Notes can be placed under the lace as well as through the trims and ribbon.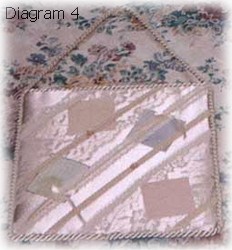
Once you have all your lace and ribbon secure and you are happy with the results, glue a decorative trim around the outer edge of your board, extending the trim up over the top and back down to the board, as shown in diagram 4. This will be your hanger. If you prefer to hang your board without the top loop, simply add a hanger to the back of your board.
Copyright © 1999-2014 Susan Spatone All rights reserved.
Published with permission from CraftAtHome.com


Leave a Reply