Last updated on January 7th, 2021 at 03:37 pm

Crocheted Moccasin Slippers

by Sue Norrad
Crochet moccasin slippers for the whole family with this free pattern, which includes directions for sizes from extra small to extra large.
We also have a free Knitted Moccasin Slipper Pattern in a variety of sizes.
MATERIALS
Yarn: 4 ply worsted weight yarn. Made with double strands. You hold two strands of the yarn together while working the pattern. I bought large skeins, 170 g and had enough left over for a few more pairs. So I am not exactly sure about how much yarn is required.
Hook: 6.00 mm (J hook)
Instructions
ch – chain
ss – slip stitch (the standard abbreviation is sl st, but I like to use “ss” as it’s faster to type.)
sc – single crochet
dc – double crochet
hdc – half double crochet
tog – togethe
SIZE: These will fit a foot of 9 and 1/2 inches.
GAUGE: 2 sts = approximately 3/4 inch
I have tips in blue throughout the pattern for making a smaller or larger pair. Please note that I have not tested the pattern using smaller or larger sizes. I am only going by my gauge.
The numbers for different sizes will be in blue and listed in this order (Extra Small, Small, Large, Extra Large) You can go even smaller by starting with 2 less chs than the extra small size. As well you can go even larger by starting with 2 chs more than the extra large size. But I have only included those sizes above. Once you see how the sizes go and figure out the desired foot size by the gauge, you should be able to do this on your own.
Working with 2 strands of yarn held together, Ch 20 (16, 18, 22, 24)
RND 1 – 2 sc in 2nd ch from hook. 1 sc in next 9 chs (7, 8, 10, 11), 1 hdc in next ch, 1 dc in next 6 chs (4, 5, 7, 8)2 dc in next ch, 5 dc in last ch. Working down the other side of the chain make 2dc in next ch, 1 dc in next 6 chs (4, 5, 7, 8), 1 hdc in next ch, 1 sc in next 10 chs (8, 9, 11, 12), ss to join to first sc. Do not turn.
RND 2 – Ch 1 and 1 sc in first st, 2 sc in next st, 1 sc in next 9 sts (7, 8, 10, 11), 1 hdc in next st, 1 dc in next 10 sts (8, 9, 11, 12), 2 dc in next st, 3 dc in next st, 2 dc in next st, 1 dc in next 10 sts(8, 9, 11, 12), 1 hdc in next st, 1 sc in next 9 sts (7, 8, 10, 11), ss to join to first sc. Do not turn.
RND 3 – Ch 1 and 1 sc in next st, 2 sc in next st, 1 sc in next 20 sts (18, 19, 21, 22), 2 sc in next st, 1 sc in next 3 sts, 2 sc in next st, 1 sc in next 3 sts, 2 sc in next st, 1 sc in next 20 sts (18, 19, 21, 22), 2 sc in last st, ss to join to first st. Do not turn.
RND 4 – This round makes a turning ridge for the sides. Working through the front loops only, ch 1, 1 ss in each st all around, pick up two strands of the color you are going to be using for the rest of the slipper, then ss to join, ch 2, TURN. (Tips: Do not make your slip stitches too tight.)
If you are changing colors, do it here. (You can do the whole slippers in one color or use whatever colors you want.) Pick up the new color and continue:
SIDES
(Tip: whenever you turn your work, begin in the first st, not the slip stitch where you joined on the previous round.)
RND 1 – Through back loops only for this RND, 1 dc only of the next 18 sts (16, 17, 19, 20), 1 hdc in the the next st, 1 sc in next 19 sts (17, 18, 20, 21), 1 hdc in next st, 1 dc in next 18 sts (16, 17, 19, 20), ss to join to first st, ch 2, turn.
RND 2 – Through both loops 1 dc in next 17 sts (15, 16, 18, 19), 1 hdc in next st, 1 sc in next 20 sts (18, 19, 21, 22), 1 hdc in next st, 1 dc in
next 17 sts (15, 16, 18, 19), ss to join to first dc, ch 2, turn. (56 sts)(48, 52, 60, 64)
RND 3 – Through both loops, 1 dc in next 11 sts (9, 10, 12, 13), 1 hdc in next st, 1 sc in next 2 sts, 1 ss through back loops only in next 28 sts (don’t make them too tight) (24, 26, 30, 32), through both loops again make 1 sc in next 2 sts, 1 hdc in next st, 1 dc in next 11 sts (9, 10, 12, 13), ss to join to first st, ch 1, turn.
RND 4 -Through both loops, 1 sc in next st, 2 sc tog, 1 sc in next 10 sts (6, 8, 12, 14), through back loops make 1 ss in next 30 sts (26, 28, 32, 34), through both loops again make 1 sc in next 10 sts (6, 8, 12, 14), 2 sc tog, 1 sc in next st, ss to join to first sc, fasten off.
TOP OF SLIPPER
I have a few photos for Rows 1 and 2 to help you get started. The rest of the rows will follow the same pattern so I didn’t put up any more photos.
Note: For smaller slippers you may have to leave OFF a Row or two, but do follow Row 7 for crocheting all around the slipper and you will have less dc on the top because of leaving off a row or two. For larger slippers, you may have to do a Row or two extra before you do Row 7.
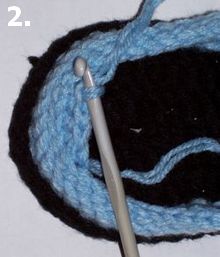
ROW 1 – With toe end facing you, find the 7 slip stitches at the center front of the top edge of the toe end. Beginning on right hand side, join yarn with a a slip stitch in back (inside) loop of the first of the 7 central slip stitches, as in Photo 1 at right.
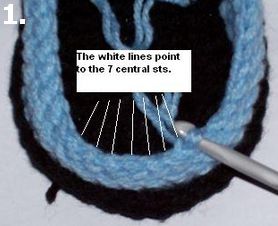
Skip the next ss, 1 hdc in next ss, 1 dc in next ss, 1 hdc in next ss as in Photo 2 at far right.
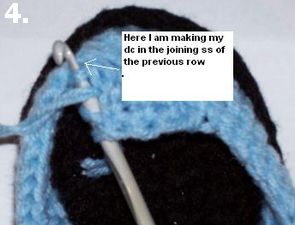
skip the next ss on the top edge, ss through the back (inside) loop of the next ss on the top edge, ss through the back (inside) loop of the next 2 ss as in Photo 3, turn.
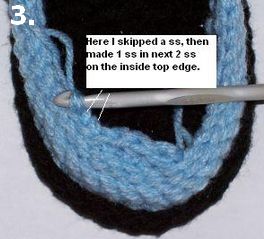
ROW 2 – Through both loops make 1 dc in the next hdc, 1 dc in next dc, 1 dc in next hdc, 1 dc in the joining ss on top edge of the previous row, as in Photo 4.
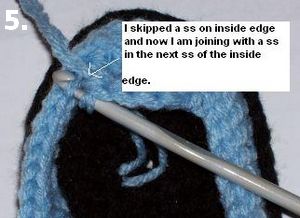
Skip next ss on top edge, join with a ss to the inside loop of next ss on top edge, as in Photo 5.
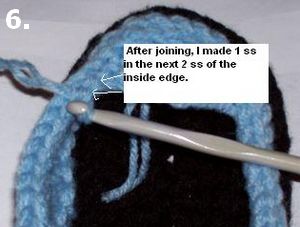
ss through the inside loops of the next 2 ss of top edge as in Photo 6, turn. (4 dc)
ROW 3 – 1 dc in next 4 dc, 1 dc in the joining ss on top edge of the previous row. Skip next ss on inside top edge, ss through inside loops of next ss on top edge, ss in next two inside loops on top edge, turn. (5 dc)
ROW 4 – 1 dc in next 5 dc, 1 dc in the joining ss on top edge of the previous row. Skip next ss on top edge, 1 ss through inside loops of next ss on top edge, 1 ss through inside loop of next 2 sts on top edge, turn. (6 dc)
ROW 5 – 1 dc in next 6 dc, 1 dc in the joining ss on top edge of the previous row. Skip next ss on top edge, 1 ss through inside loops of next 2 sts on top edge, turn. (7 dc)
ROW 6 – 1 dc in next 7 dc, skip next st on top edge, 1 ss through inside loops of next 2 sts on top edge, turn.
ROW 7 – This will actually be a ROUND as you will be going across the top and around the whole slipper and then across the top again. 1 sc in each of the 7 dc, 1 ss through inside loop of next st on the top edge. (Now continue around the foot opening) 1 ss through BOTH loops in each sc all around. Join with a ss to the inside loop of the same st at the beginning of this Row. 1 ss through both loops of the 7 sc across the top, join with a ss through the inside loop of the the next st, fasten off.
Contributed by Sue’s Crochet and Knitting site, which offers Free Crochet and Knit Patterns, a Craft Discussion Board, Craft Supplies and much more.


Cheryl says
Can I get a printed copy, willing to pay for it.
I just don’t care fir all the adds
Thank you
Jane Lake says
Hi, Cheryl, I am working on this for you. Would a printable ad-free PDF be acceptable?
Marji says
What is the corresponding size to XL, is that men or woman?