Last updated on September 24th, 2024 at 09:19 pm
Recycled Christmas Cards
or …
How to Make New Greeting Cards from Old Cards
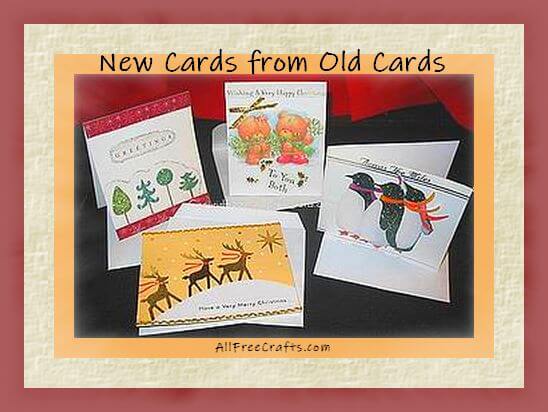
With a few inexpensive embellishments, you can easily make high-quality Christmas cards from the old Christmas cards that you have received in previous years!
Before you dismiss this idea as too chintzy, consider – what else will you do with those greeting cards? We have other great ideas for recycling greeting cards. But here, I’m going to show you how to use old cards as a valuable resource for making new ones that are better than store-bought. And here’s why:
1) Each card is homemade which means the design and sentiment is truly heartfelt and one-of-a-kind.
2) The crafting techniques combine decoupage, collage, scrap booking and basic paper tole, which are wonderful crafting skills worth trying at least once.
3) This recycled card project is just plain fun. You can pick from appealing, professionally designed greeting card pictures, combine them into something new, then add your own touch of glitz, sophistication, humor or elegance with embellishments.
Craft Supplies:
- used Christmas cards
- standard white or colored card stock
- medium weight paper for the printable envelope
- ruler or straight edge, and a pencil, for measuring and marking
- tacky glue
- scissors – sharp, fine-nosed embroidery or needlework scissors for detail cutting; sharp household scissors or paper cutter for straight lines
- pinking shears or craft edging scissors – optional, but useful if cutting fabric or paper shapes
Suggested Embellishments
- gold or silver rick rack; thin gold or silver ribbon or bows;
- stickers, fancy bubble stickers; paper, card or craft fun foam stickers; scrap booking charms; seasonal confetti;
- small-scale pressed flowers, leaves, herbs or vines
- fabric scraps – think memory quilt, homespun, sheer, or any other fabric that excites the imagination and fits your theme
- small photos or cut-outs from gift wrap that suit your theme
- any fairly flat ornament that fits your motif – possibly an image or font text made of metal, paper, cardboard, plastic, flocked paper or any other medium that is lightweight and flat enough to fit into a card envelope
DIY Instructions:
Picking a Theme: Spread your old Christmas cards out on a table. Sort them into themes or motifs that make sense to you – maybe a group of cards with a snow theme, including snowmen, snowflakes, or snowy landscapes etc., then another group of Santa cards, or a group of cards that are predominantly blue in color, with yet another group of religious card scenes. Each one of these card groups is a possible motif for new cards.
Cut a New Card Base: You can get three cards of the size shown here from one standard 8.5 x 11 inch sheet of card stock. Measure and mark off three full-width lines at 3.5″ intervals. Cut out these 3.5″ x 8.5″ inch strips, discarding the last 1/2 inch piece.
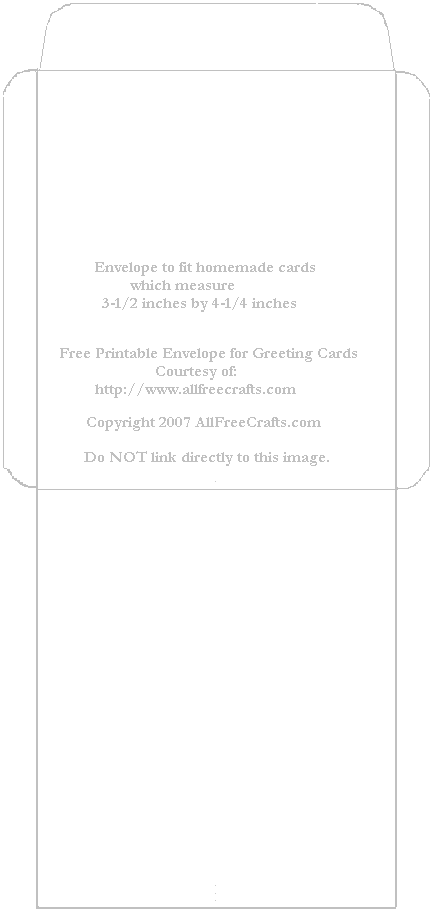
Instructions for a free printable envelope to fit these cards follows at the end of this article.
Reinforce the Folds: Fold each card stock strip in half, taking extreme care to line up all of the sides before you press in the fold. Reinforce the fold by running a blunt object (scissor handles usually work well) firmly along the fold line to create a ‘permanent press’ crease.
Decide on the Angle: Now that you have a blank card base, you can choose to make a top-folded card or one that is folded at the left and meant to be opened on the right.
The Fun Part: Here’s the creative part of making new cards from old ones – begin by sizing up your blank card against the images and embellishments available to you. Remember that you can cut around the main image on a used card and reuse it as the main image on your new card, but a secondary image may work equally well.
Occasionally, the front of an old card can be cut to fit the entire front of your new card. If this is the case, have fun improving the original by adding your own embellishments.
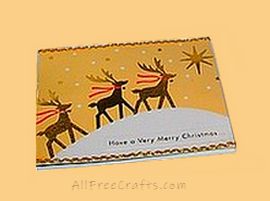
For the reindeer card shown in this project, I put the card template on top of the reindeer image, traced very lightly around it in pencil (thus eliminating some gold stars), then cut it out.
The ‘Have a Very Happy Christmas’ sentiment was already stamped on a raised rectangle so I just cut this out as well and glued it to my new card. This looked good but wasn’t quite right, so I added a length of thin, gold rickrack at the top and the bottom of my new card front. That cemented the image, making it look as if it belonged on my card from the get-go.
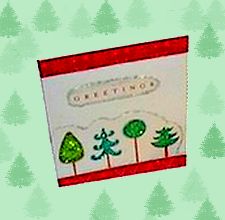
My samples include a simple ‘Greetings’ card with stylized, yet subdued glitter trees in a straight line. I had to cut two trees off the original, then make the word ‘Greetings’ into a word bubble outlined in white glitter dimensional paint.
The burgundy and snowflake borders originally appeared as one thick line at the bottom of the original. I cut this down by half and glued the other half to the top of the new card which pulled the whole thing together very effectively. You can often cut down borders or corners to reuse on your new card.
Adding Paper Tole Effects
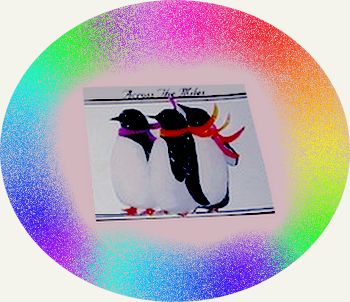
Check out the teddy bear and penguin cards closely and you may see the teddy bear motif and middle penguin aren’t glued down – instead, they are backed by a ¼ inch strip of card which is then glued to the card, creating a three-dimensional paper tole effect.
The penguin card began with a line of three penguins too wide for my new card base. I cut out and glued on two of the penguins, then backed the third one with a ¼ inch strip of card. Glued down by this strip of card between the original two penquins, the third penguin really stands out from the crowd.
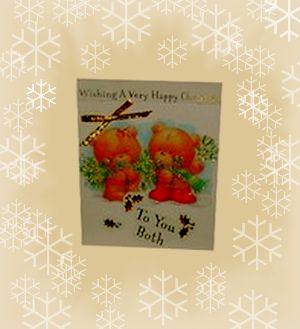
The teddy bear card also got a three-dimensional boost by adding a tiny gold ribbon bow plus gold ivy cut out in a bubble shapes from the original card.
Inside the Cards: You can leave the inside of your card blank and add a handwritten message when it comes to send the card. Or you can cut and paste words, phrases, poems or quotations that came from your original cards. Outlining these cut-outs in dimensional paint, glitter glue, thin ribbon or something similar will help make them appear as original parts of the card.
Variations: Check out the scrap booking section of the dollar store for assorted charms or three-dimensional stickers. Stock up on various widths of ribbon when you find it on sale. Cut rectangles of fabric, fray the edges, mount on your card, then glue on a snowman, Santa Claus or other Christmas image. Don’t be afraid to experiment – each one of your homemade creations is sure to treasured next Christmas!
Homemade Envelopes for Your Cards
I have created a free printable envelope to fit these 3.5 x 4.25 cards. Print out the envelope and pre-fold all the creases, including the side flaps and the closure flap. Open up the envelope and run a line of glue along the side flaps. Fold up the back and glue to the side flaps so that they are now inside the envelope. Let the envelope dry, then enclose your card and glue down the closure flap.
You can make your own envelopes to fit any size of card, of course – essentially, you can use my printable envelope as a template for your own design – just adjust the size to suit.


Colleen says
Debbie, I thought of the copyright issue. It feels like a problem to me
Jane Lake says
I do take copyright seriously, Colleen (and Debbie). It may be an issue if you were mass producing cards for sale, but this project is meant to be a personal recycling project that reuses old cards that otherwise would be trashed. You’re creating single, individual cards from recycled materials and adding embellishments to make each new card unique. I personally don’t see a problem with that.
Debbie says
This is meant to be helpful. I am unsure, but using a greeting card to make a different greeting card may be a copyright issue.
Jane Lake says
If you are recycling old cards to make new ones for family and friends, I think it’s fine. But you have a point that’s worth considering before you embark on selling them for profit.