Last updated on December 2nd, 2015 at 01:05 am
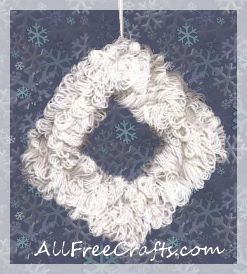
Coat Hanger and Yarn Wreath
One look at the coat hanger wreath pictured here and you just itch to decorate it! Who would guess that a humble recycled wire coat hanger is the base?
Vary the look by your choice of seasonal wreath decorations.
Craft supplies you will need:
- one wire coat hanger
- scissors
- 3-4 skeins of yarn, any color
- 2 to 4 garlands (the thicker they are, the fewer you’ll use)
- 1 piece of sturdy cardboard 6″ x 4″ or 5″ x 4″ or 4″ x 4″ (The 4″ width is to give a good grip)
- decorations – assorted ribbons, ornaments, sequins
- scotch tape, glue, paper clips, christmas ornament hangers
Instructions
This project requires some dexterity, but you will soon get the “hang” of it.
 Figure 1
Step 1. Bend the hanger to the desired shape.
Step 2. Pick up the roll of ribbon and scotch tape or hot glue the ribbon at the bottom of the hook on the neck of the hanger. See Figure 1.
Step 3. Wrap the ribbon ’round and ’round the hook out to the tip and back again to the base and snip it – making sure you keep tension on the wrapped ribbon or it will unravel.
See Figure 1.
Step 4. Scotch tape or hot glue the ribbon to secure it.
See Figure 1.
Step 5. Bend the hook so it resembles a closed loop and set the hanger aside. See Figure 1.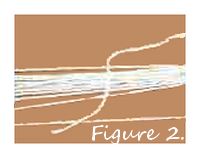
Figure 2
Step 6. Pick up the yarn and the cardboard. Place the end of the yarn at the bottom of the cardboard (exact is not necessary) and wrap the yarn around 10 times.
See Figure 2.
Step 7. Cut the yarn so the end you are snipping is at the top of the cardboard (again – exact is not necessary).
See Figure 2.
Figure 3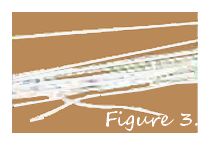
Step 8. Grab the two ends and tie them together with a square knot right in the middle of the cardboard. Be sure to leave plenty of tail.
See Figure 3.
 Figure 4
Step 9. Slip the yarn off the cardboard and cinch the loops at the waist using the two ends you tied in a knot. A simple half-knot is all you need right now.
See Figure 4.
 Figure 5
Step 10. Pick up the hanger and tie the loops to it with the two ends of yarn. Use a quilter’s knot to secure them.
See Figure 5.
Step 11. Push the yarn as far up as you can. See Figure 1.
Step 12. Repeat Steps 6 through 11 until the wreath looks the way you want it to.
Step 13. Decorate or not according to your taste. This wreath can be done in any color for Christmas, weddings, Easter, whatever.
NOTE: As a variation – use a box of 200 sandwich baggies instead (not zip top). Just tie them on higgledy-piggledy and push them up until you can’t fit anymore on. Voila! A pretty, weatherproof wreath!
About the Author: Sunni Bergeron has been crafting in various media for 30 years.


Leave a Reply