Last updated on December 5th, 2024 at 11:24 pm
Here’s an easy Christmas craft that uses recycled Christmas cards to make cute little greeting card angels suitable to use as table decorations, tree trims or for adding to a wreath or gift.
by Jane Lake
Christmas Card Angels

Craft Supply list:
- one or two Christmas cards for each angel – the number depends on how large you want your angel to be
- wooden beads
- small amount of synthetic curly doll hair or yarn to use as hair
- fine black permanent marker
- gold or silver chenille stem, or brass wire, to use for the halo
- glass, saucer or compass and pencil to draw a circular pattern
- acrylic flesh colored paint – only needed if the bead is a dark wooden color; light wooden beads are fine without paint
- glue – preferably tacky glue, but white glue will work too
- optional – stapler
- optional – ribbon or cord if you wish to attach a hanger
- optional – paint, sequins, glitter or additional decorations
Directions:
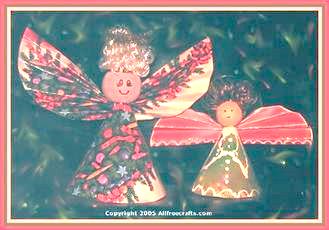
Essentially, you will make each angel from two half circles cut from the front of Christmas cards. Both of the angels shown were made from similar sized cards, but you only need one card for the smaller angel and two for the larger version. Make the two main pieces of the smaller angel by tracing and cutting out a full circle from the front of a single card, then cutting this circle in half.
Make the two pieces of the larger angel by first tracing and cutting a circle from the discarded back of a card. Cut this circle in half and discard one side. Use the other side as a pattern. Trace around the half circle pattern onto the front of two separate cards and cut out these pieces.
The directions are now the same for both angels. Take one of the half circles and fold it into a cone shape, overlapping a little at the back and bringing the cone to a fairly sharp point at the top. You can staple the overlapping edges together or use glue. This is the angel’s body.
Take the other half circle and, beginning at the straight edge, fold over about 1/8″ inch, then turn the circle over and fold the edge over again in the opposite direction. Repeat the folds, accordian style, until you reach the other edge. Fan out the accordian folds slightly, then pinch firmly in the center. These are the angel’s wings.
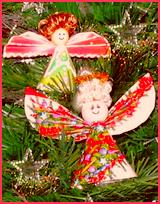
For a similar take on this project (shown at right), please read how to make Paper Doily Angels. These sweetheart angels are simply charming.
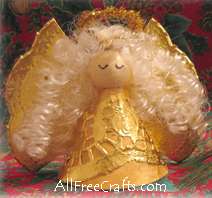
If required, paint the wooden bead in flesh color. When dry, use fine permanent marker to draw on the angel’s face, using our photo as a guide and positioning the holes of the wooden bead at the top and bottom. The small angel has just two dots as the eyes and a simple curved smile; the larger angel has “0” shaped eyes, with a black pupil drawn in and three small eyelashes curving out from the bottom outside edge of the eye.
Place some glue in the bottom hole of the bead. Now slide the bottom hole of the bead onto the sharp point of the cone, making sure the face is at the front and the overlapping edges of the cone are at the back. Let this dry firmly in place.
Shape a short length of brass wire, or a metallic chenille stem, into a round halo with a stem. Glue the stem into the top hole of the bead so that the stem is positioned at the back of the head and the halo is centered over the top of the angel.
Glue a small amount of curly doll’s hair (or yarn) under the halo, covering the top hole in the bead completely.
Glue the angel’s wings into place, centering the wings just below the bead at the back. You can either have the rounded edge of the wings at the top, or the straight edge – check our photos to see the slightly different looks that this creates.
If desired, add a small loop of ribbon, thread or cord at the back to use as a hanger. We also painted a white collar, long sleeves and clasped hands on the a small angel, then added a series of painted loops along the bottom of the angel’s body and wings. Sequins or glitter would also be nice additions.


Susana yang says
merry christmas ,happy new year