Last updated on October 31st, 2015 at 02:21 am

Bottle Cap Ornament
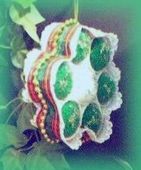 Soda Bottle Cap Christmas Ornament
designed by Twila Lenoir and Jane Lake
Recycle soda bottle caps and make a great Christmas tree trim in this free Christmas craft project. It’s easy, fun to do, and you’ll get great results while improving the Earth by recycling!
All in all, a good, very inexpensive and creative Christmas art project for the classroom or youth group.
Craft Supplies:
- 7 soda bottle caps
- Felt
- 6 pompoms or cotton balls to fit on top of the bottle caps
- 1 pompom or cotton ball for the center (can be same color as the rest of the pompoms or a contrasting color)
- Pretty 1 ¼ inch wide ribbon
- String of pearls
- Fine glitter
- String or thin ribbon for hanger
- Crafting tools: glue, scissors, a pencil
Craft Project Instructions:
1. Place one bottle cap on your work surface to use as the center of the ornament. Glue the other caps all around it, with each one being glued to the center cap and then to the caps beside it. When you are finished, it should look a little like a flower.
2. Trace a pencil line around the edge of the bottle caps onto a piece of felt then cut out the flower shape, cutting just inside the pencil line. Glue the felt to the back of the caps.
3. Glue on the pompoms or cotton balls.
4. Glue on a loop of string or ribbon to use as a hanger.
5. Starting at the top, near the hanger, begin gluing the ribbon all around the flower shape. Make sure that you center the ribbon as you work, so it overhangs both the front and the back sides of the caps just a little bit.
6. Glue a string of pearls down the center of the ribbon.
7. Add some swirls of glue on top of the pompoms or cotton balls and sprinkle with fine glitter. Tap off the excess. Voila! A pretty Christmas ornament made from recycled bottle caps – but you’d never guess, now would you? Enjoy!


Leave a Reply