Last updated on November 16th, 2015 at 01:58 am
 Free vintage knitting pattern to make a doll sweater from 1904.
by Laurie Knaston
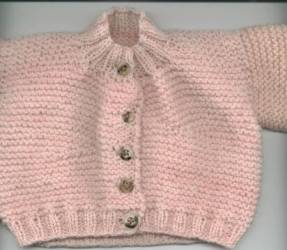
Laurie Kynaston is a “knit nut” who has adapted this sweater for an 18″ doll from a vintage pattern. It features a “pouch front” to give the “pigeon breasted” look so fashionable in 1904!
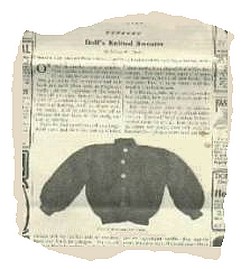
I found this charming pattern for a knitted doll’s sweater in the May, 1904 issue of ‘The Modern Priscilla’. It features a ‘pouch front’, made with short rows, to give the “pigeon-breasted” look that was so fashionable in 1904! The construction of the sweater is interesting: you knit the back, then ‘over the shoulders’ and down each front, then pick up and knit the sleeves. I have adapted the directions for today’s knitters, but also include the original instructions for ‘adventurous’ knitters (note: the original instructions are pretty vague!)
 DOLL’S KNITTED SWEATER
UPDATED INSTRUCTIONS
(revised from directions in the May 1904 “Modern Priscilla” magazine).
This should fit an “American Girl” or other 18″ doll (my 19 year old daughter’s AG doll is lurking in her dad’s basement…as soon as I can retrieve it, I’ll take a picture of her in her new sweater!). Materials: 2 skeins dk or sport weight yarn (I used 1 skein of a sportweight wool with no label; ran out and had to finish up with another pink yarn…) I would guess you will need approximately 300 yards. 5 small buttons. Knitting needles US #2 & 4. No gauge was given on the original pattern, but my gauge is 6 sts=1″ on the #4 needles and garter stitch.
Back: With #2 needles, cast on 42 sts. Work k2, p2 ribbing for 1/2″. Change to #4 needles and garter stitch, and work even for 4″ (22 ridges/44 rows). Bind off 3 sts beg. next 2 rows for armholes. Work even for 3″ (14 ridges/28 rows).
Back neck shaping: k 13 sts, bind off next 10 sts, k last 13 sts. Place the 1st 13 sts. on a holder or piece of waste yarn and work on the last 13 sts (this is the left side of the neck, and will be the left front). Work even for 6 rows. Inc 1 st at neck edge on 7th row, and 1 st at neck edge on 9th row. Work 2 rows even, then cast on 15 stitches at neck edge–this is the sweater front and you should have 30 stitches.
 Left Front: Knit even on all sts until front is same length as back to underarm (14 ridges/28 rows), and cast on 3 stitches for underarm at armhole edge.
Working pouch front shaping: Next row (you’ll be working from the armhole edge) knit 23 sts, turn, slip 1st stitch and knit across. 2nd short row: knit 21 sts, turn, slip 1st stitch and knit across. 3rd short row: knit 19 sts, turn, slip 1st stitch and knit across. 4th short row: knit 17 sts, turn, slip 1st stitch and knit across.
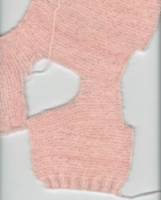
Your left front will look like the picture at left. Work even until front is same length as back to ribbing, dec 1 st on last garter st. row. Change to smaller needles and k2, p2 ribbing. Work ribbing for 1/2″, then bind off.
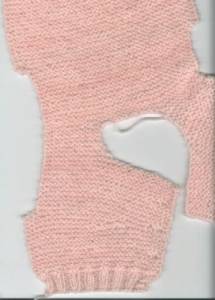
Right front: pick up 13 stitches from holder/waste yarn. Work same as left front, reversing all shaping AND WORKING BUTTONHOLES AS FOLLOWS WHEN FRONT EDGE MEASURES 1″, 2″ AND 3″ & WHEN RIBBING AT BOTTOM MEASURES 1/4″: at front edge, k2, bind off next 2 sts, work across. Next row, work to buttonhole and cast on 2 sts over the bound off stitches. (Note: don’t sweat it if you forget to work the buttonholes! You can take a knitting needle and ‘drill’ a hole where desired and have a perfectly fine buttonhole!) Your right front will look like the picture at right.
Sleeves: Pick up 38 sts along the armhole edge. Work even for 4.5″ (28 ridges/56 rows), dec on last garter st row as follows: k9, (k2 tog) 10 times, k9. You should have 28 sts. Change to #2 needles and k2, p2 ribbing. Work in ribbing for 1/2″, bind off.
Neck: Pick up 48 stitches around neck edge (14 sts/20 sts/14 sts on right front/back/left front). Work in k2, p2 ribbing, working a button hole at right front when ribbing measures 1/4″. Work for 1/2″, bind off loosely.
Finishing: Sew underarm & sleeve seams, sew on buttons.
 ORIGINAL INSTRUCTIONS FROM THE MAY 1904 “MODERN PRISCILLA” DOLL SWEATER PATTERN, By Rebecca W. Mather
Medium Size; Shetland floss, 2 skeins; 1 pair No. 16 knitting needles; 1 pair No. 10 knitting needles.
On No. 16 needles cast on 42 stitches. Knit 2 plain, 2 seam, to the depth of one-half inch, or more if desired. Now put in the No. 10 needles and knit back and forth plain until 22 ridges are made. At the beginning of the needle bind off 3 stitches, knit across, turn, and bind off 3 stitches at beginning of needle. Continue knitting until 14 ridges more are made. Knit 13 stitches, bind off 10 stitches for the back of the neck, and knit 13 stitches.
Take the first 13 stitches off on a large-sized yarn and knit the last 13 stitches (which will be the left side of sweater) back and forth for 3 ridges. On the 4th ridge at the side nearest neck widen one stitch. Widen at the completion of the 5th also. On the completion of the 6th ridge cast on 15 extra stitches for the front of the sweater. Knit back and forth plain until the front is as long as the back under the arms, casting on 3 stitches at the completion of the 14th ridge for under arm.
To make the pouch front, knit from the front till 10 stitches are left on the left-hand needle, turn, slip off first stitch, knit across. The next time leave 12 stitches on the needle, turn and knit back. Do this three, four or more times, until the front is pouched to suit.
For the neck, take up 54 stitches on the fine needles, knit 3 plain at each end, the rest 2 seam, 2 plain.
For the sleeve, pick up the stitches (beginning at the cast-on stitches) under the arm. There will be 38 stitches; if more, narrow away the extra. Knit plain until 35 ridges are made, then knit with the fine needles 2 plain, 2 seam, until 9 stitches are on the right-hand needle; then narrow every time you take off the stitches til you have narrowed 20 stitches into 10. Knit the remaining 9 without narrowing, which leaves 28 stitches. Knit the wrist as deep as desired. Knit the right side of the sweater to correspond with the left.
To knit the buttonholes, knit till there are 4 stitches on the needle, bind off 2, knit remaining 2, turn, knit 2, cast on 2, and continue knitting as before.
Sew up the under arm and sleeve, and the sweater is complete.
“1904 Doll Sweater” pattern © 2000-2014 By Laurie Kynaston of https://www.vintageknits.com. You may share this pattern on your on-line knitting pattern collections or in newsletters, providing this notice remains attached. (I would appreciate notification if you use this pattern!) This pattern is intended for personal use, or for charitable donations/sale. Please contact me at lavs@vintageknits.com for permission to include this pattern in any written collection or to use it for commercial purposes.


Leave a Reply