Last updated on September 5th, 2015 at 09:41 am
Walnut Pumpkin
Nutty Pumpkin Craft
Here’s a cute li’l pumpkin with a nutty sense of humour – why not make a bunch of them to add to your fruit bowl or to scatter across the windowsill? Make the string longer to wear as a necklace on Halloween, or skip the string completely and add a magnet to make a nutty pumpkin fridgie.
Material:
- 1 Walnut
- Orange craft paint
- Green craft foam (teeny scrap piece)
- 1 Green pony bead
- 3 Inch length of string or ribbon
- Hot glue
- Black craft paint
- Scissors
- Hole punch
How to:
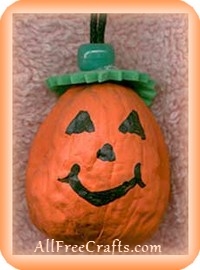
Paint your walnut using orange craft paint and allow the paint to dry. You may need two or three coats of paint, to cover the nut completely. Allow each coat of paint to dry completely, before applying the next coat.
Cut a small circle from green craft foam and with the tips of your scissors, cut little sections along the outside edge of your circle. This simply adds a little dimension to your foam or, you can cut any shape you like.
For a little more detail, you can cut little leaf shapes from the foam circle, but this will be for the more advanced crafters.
With a hole punch, punch a hole in the very centre of your foam circle. Fold a three inch length of string in half and add a little dot of hot glue to the cut ends of your string (keeping the ends pinched close together). Attach the string ends to the pointed top of the walnut.
Allow the glue to harden and then place the string (folded end) through the hole you punched in your green foam and then feed the string through your pony bead. Pull both the foam and pony bead down the string and position tight against the walnut. If your string is fine, you may need to add a dot of glue to secure the foam and bead in place.
Using black paint, paint a simple face, similar to the one in our photo, and allow the paint to dry.
Copyright © 1999-2015 Susan Spatone All rights reserved.
Published with permission from CraftAtHome.com


Leave a Reply