Last updated on January 17th, 2015 at 06:16 pm
Scrapbook paper book cover
Paper ‘n’ Ribbon Book Covers
This paper book cover, or dust cover, fits a standard hard cover novel. You will need to check the measurements of your book before starting to be sure your cover will fit.
Craft Supplies:
- 2 Sheets of 8 1/2 x 11 Scrapbook Paper
- Clear Drying Glue (I used Elmer’s Wrinkle Free Glue)
- Ribbon
- Scissors
Craft Instructions:
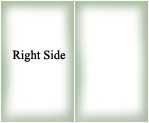 Lay the two sheets of paper with right sides up and long edges of each sheet placed side by side.
 Glue a strip of ribbon to conceal the seam of paper (long enough to cover both the front and back seam) and hold both sheets together.
You will now have a sheet that measures 11″ x 17″.
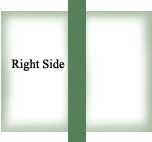
 With the paper sheet right side down, fold the ribbon over and glue in place at the centre to hold the inside paper seams together.
Fold the top and bottom edges (wrong sides together) toward center to fit the measurement of your book and glue to secure.
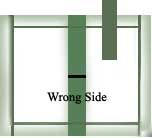 Fold the right and left sides (wrong sides together) to fit the open face book width. Do not glue the side pieces as your book will slide into these open folds.
Glue a strip of ribbon that is as high as your book plus about 4 inches to use as a bookmark. Be sure to place the ribbon with the right side of the ribbon against the wrong side of paper.
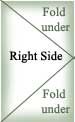
 Make corner pieces from ribbon, by cutting a length of ribbon that is long enough to cover the entire corner x 2. Referring to the diagram at left, fold wrong sides together to create a corner section.
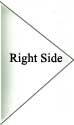
Your corner should look like the right side diagram. Glue the corner piece to each corner of the book cover with the ribbon ends glued to the inside cover of the book. (The corners are slipped over or folded over the corner of the book cover). Repeat for all four corners.
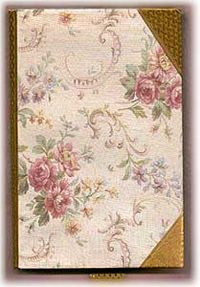
 Your outside finished book cover should now be complete and look like this final diagram.
Just slide the front cover and the back cover of your book into the side pockets of your new book cover to secure.
Copyright © 1999-2013 Susan Spatone All rights reserved. Published with permission from CraftAtHome.com


Leave a Reply