Last updated on March 6th, 2016 at 12:29 am
Learn how to cut your own stencils for craft design, home decor, and artistic embellishments..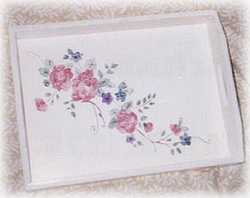
There are many resources for stencil making. You can start with a fabric or wallpaper motif or just use a photo from a magazine. This tray was made from a stencil that I cut myself. It is a triple layer stencil and though a little more difficult, the end result is well worth the effort.
Make a Stencil
Craft Supplies:
- Mylar (or another suitable stencil material – see suggestions below)
- Craft Knife
- Permanent Marker
- Photocopy of pattern
- Lots of Patience!
Project Instructions:
Stencils can be cut from hard plastic, cardboard, paper or mylar. Cardboard and paper stencils won’t hold up to the abuse plastic ones will, but they work fine for small projects. Hard plastic stencils are good strong stencils that will last for years.
Mylar are my favourite (mylar sheets are available at most craft and office supply shops). Not only are they strong, and washable, they are flexible enough to apply to round surfaces and bend into corners. I always
use mylar for my stencils that will be over-worked and paper for simple one time use. Providing you use water paints, the mylar stencils will clean up easily with a little soap and water.
You need to find your pattern, maybe from a picture in a book or a design from fabric. If you are a beginner,
keep your pattern simple, a complex pattern can be very difficult to cut and usually requires several layers to obtain a nice replica. Photocopy your pattern, reducing or enlarging to the desired size.
Tape your sheet of mylar or what ever medium you are using on top of your design and trace the outline with a black permanent marker. If you are using cardboard or paper that you can’t see through, insert a piece of carbon paper between the cardboard/paper and your design, then trace over the design.
 Cut your pattern with a craft knife (you can purchase pen style utility knives at office supply shops and I recommend these knives over all others). Be sure to keep your edges smooth and take your time. Making your own stencils is not for people with little patience. But, the results are one-of-a-kind.
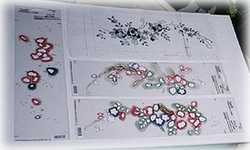
Three Part Stencil
The stencil shown here was used for the tray pictured above.
Beginning with the black and white print that was taken from a magazine. I decided a 3 layer stencil worked best and shaded each area of the black and white a little lighter for each stencil layer. The photo doesn’t show it well, but there are three shades on the black and white. I then traced onto ready made blank stencils the patterns for all three layers. I photographed this after using the colours to stencil, to give you a clearer view of how this system works.
Starting from your left view of the photo is layer one. First layer to be stencilled. Then the centre image is layer two and finally the bottom right is layer three. Though you may think this is too complicated, it really isn’t. It just takes a lot patience.
Copyright © 1999-2014 Susan Spatone All rights reserved.
Published with permission from CraftAtHome.com


Leave a Reply