Last updated on January 31st, 2023 at 11:39 pm
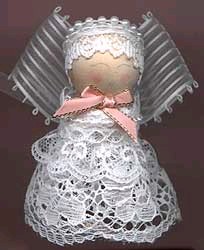
Tiny, but sweet, Ribbon ‘n’ Lace Angels

How to make wee little angel ornaments from small scraps of ribbon and lace.
Craft Supplies:
- Wood Ball
- Ribbon and Lace Scraps
- Doll Pin (see photo at right)
- Hot Glue
- Pearl Strand
- Black and red pencils or acrylic paints
Craft Project Instructions:
Glue wood ball to the top of the doll pin.
Gather together a piece of lace (approximately 10 inches long) and roll gathered edge into a skirt. Glue the rolled edge into the hole of the doll pin. Glue a smaller piece of ribbon to the outside perimeter of the doll pin. This creates the second layer of lace you see in the photo.
Glue a small piece of decorative trim or lace on top of the lace you just glued to the doll pin. Keep all your seams at the back of the angel (the wings will hide these later). Glue a piece of lace or decorative trim for hair and add a pearl strand for a halo to the head.
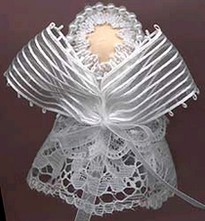
Cut an 8 inch piece of ribbon (for wings), and fold each end to the centre. The 2 ends of the ribbon will be in the centre. Secure the ribbon with a dot of glue. Tie a small bow around the centre of the wing ribbon with a small piece of ribbon. Refer to the photo (back), and pinch the wing centre, securing with a dot of glue. This will prevent the wings from coming straight out the sides of the angel.
Tie a ribbon around the neck (where the doll pin and ball join) and tie a little bow. Glue the wings to the back (refer to photo) and paint a little face, using pencils or acrylic paint.
To keep her free-standing, just add a little fibrefill or similar stuffing under the lace skirt and she’ll stand on her own.
Copyright © 1999-2023 Susan Spatone All rights reserved.


Leave a Reply